Though SSH operates via an encrypted connection, using password-based authentication is not considered a safe method. Passwords are prone to brute-force attacks, and you need to come up with a complicated password to avoid the risk of password guessing. The most preferred and secured method of connecting to a Linux VM is using an SSH key pair. The key pair comprises a public key and private key; these are also known as SSH keys.
The public key will be placed on the VM, and the private key is stored in the clients from which you want to connect. You need to make sure that this file is protected and is not shared. The SSH key pair authentication works with a key challenge; the remote VM will check if the client has access to the private key. If the client possesses the key, then access is granted; otherwise access is denied. You can also have a single key pair to connect to all the VMs or you can have a separate key for individual VMs. The public key can be shared with anyone; however, the private key should be possessed by the clients that need to connect to the VM.
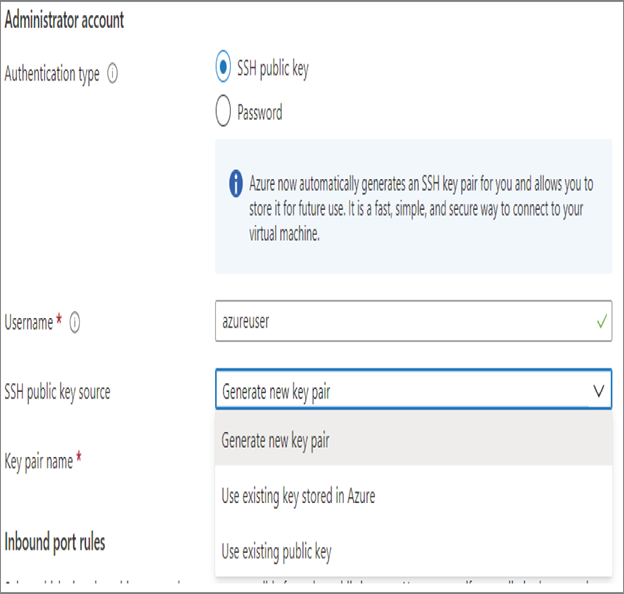
In Azure, the key can be generated in multiple ways. First, you need to make sure that the authentication type is set to the SSH public key while creating a VM. You can generate a new key pair, use an existing key stored in Azure, or use an existing public key from your infrastructure (refer to Figure 7.5). If you want to bring your own key, you can generate keys using the ssh-keygen command. Currently, Azure uses a 2048-bit key length and SSH-RSA format for public and private keys.

FIGURE 7.5 Enabling SSH key authentication
Now that you have an idea about the SSH keys, let’s create a VM from Azure CLI and generate the key on the fly; see Exercise 7.4. Later, you will use this key to connect to the VM.
EXERCISE 7.4
Connecting to Linux VM Using SSH Keys
- You can use the cloud shell or local shell to perform this exercise. If you are using local shell, make sure you install Azure CLI on your computer. In the local shell, you can log in using the az login command.
- Create a new resource group using the command az group create -n <name> -l <location>; change the name and location per your requirements. If not required, you can reuse the resource group from the last exercise.
- Create a VM using the command az vm create -n <name> -g <resource-group> –image UbuntuLTS –admin-username <username> –generate-ssh-keys. You are passing the name of the VM, name of the resource group, admin username, and image as parameters to the command. In the previous exercise, you used the parameter –admin-password to input the password; since you need the keys to be generated, you will replace this parameter with –generate-ssh-keys. You can use your own values to customize the deployment. This command may take a couple of minutes to complete.

- The generated key will be stored to your user directory under the .ssh directory. If you take a closer look at the previous graphic, you can see that the Azure CLI will tell you the exact location where the private and public keys are stored. The public key will end with the extension .pub, and the private key will not have any extension. You will be using the private key to connect to the VM. Since we are using a Windows client for the demo, the key gets stored under the C:\Users\.ssh\ directory. Depending on the OS from which you are performing this exercise, the directory will change.
- In the previous graphic, you can see the public IP address of the VM and the directory where the private key is stored. You can connect to the VM by specifying the key in the SSH command using the -i parameter. For example, use ssh -i username@publicIP. Like password authentication, you will be prompted to save the fingerprint of the remote machine; proceed by typing yes, and you will be connected to the VM.

In the case of both Windows and Linux VMs, you connected to a VM via the public IP address. This is not a commonly used method as you need to open the RDP/SSH ports to the Internet. If you remember the exercise from previous chapters, you used a jumpbox VM to connect to VMs that don’t have a public IP address associated to them. To an extent, this will help you avoid using a public IP address for all the VMs. However, the jumpbox VM is also a virtual machine with the IP public address exposed to the Internet; you need to harden this machine as much as possible because if this VM is compromised, the entire infrastructure is compromised. Hardening the jumpbox VM and keeping it away from vulnerabilities are always tedious tasks for the administrator. Azure offers a life-saver service called Azure Bastion to solve this problem. Let’s see how Azure Bastion is different from the jumpbox VM you are used to.