With Azure Bastion, you can connect to Azure virtual machines without the need to have public IP addresses. The catch here is Azure Bastion, which is a platform-as-a-service (PaaS) solution; this means you don’t have to worry about hardening the infrastructure, as this will be handled by Microsoft Azure.
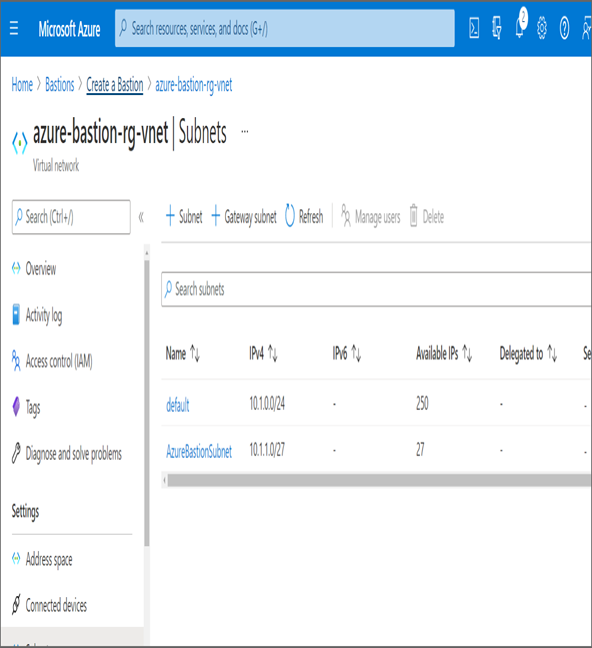
When you were using the jumpbox VM, you had to use RDP/SSH clients to connect to other machines; in the case of Azure Bastion, the connection is directly established from the Azure portal over SSL. To work with Azure Bastion, you need to deploy the Bastion host to the virtual network where your VM is deployed. Azure Bastion requires a dedicated subnet of size (minimum /27) called AzureBastionSubnet. During the initial days of Azure Bastion, you were required to deploy Bastion hosts on every virtual network where you had your virtual machines; however, with the recent update, you can use a single Bastion host to access all virtual machines that are part of peered networks. This means you could deploy this to your hub virtual network and access virtual machines on all spoke virtual networks. Using Azure Bastion, without the need of any client or public IP address, you can seamlessly establish RDP/SSH connections directly from browser.
In Exercise 7.5, you will deploy a VM without a public IP address and use the Azure Bastion service to verify the connectivity.
EXERCISE 7.5
Connecting to Linux VM Using SSH Keys
- Navigate to the Azure portal and create a new Linux virtual machine with password authentication. On the Networking tab, make sure Public IP is set to None.
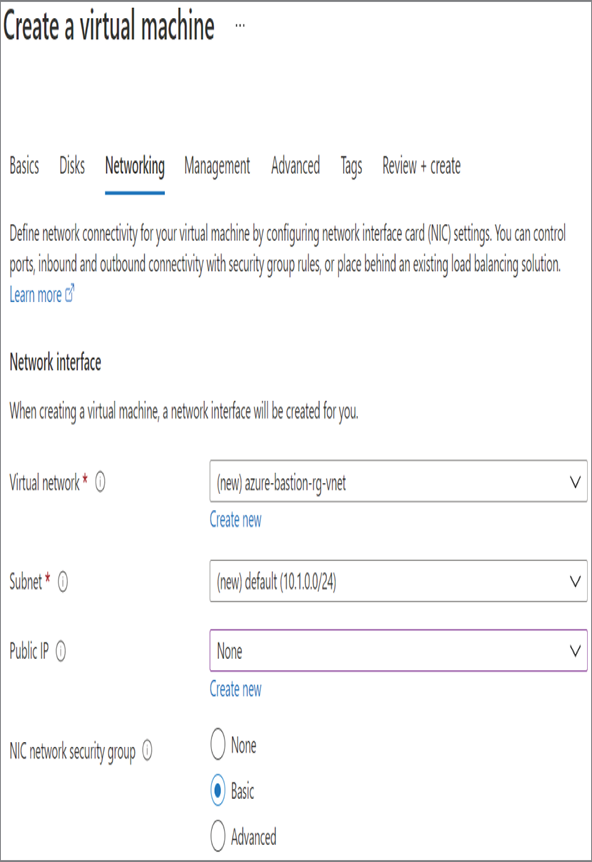
- Since you have set the public IP address to None, no public IP address will be assigned to the VM. You can complete the deployment by clicking Review + Create. Once the validation is done, click Create to create the VM.
- While the VM is getting created, in the Azure portal search for Bastion, and you will see Bastions in the search result. Click Bastions, and this will redirect to the Bastions blade.
- Once you are in the Bastions blade, click Create to create a Bastion host.
- Creation of Bastion host requires the following input from your end:
- Subscription: Select the Azure subscription.
- Resource Group: Select the resource group to deploy the Bastion host.
- Name: Give a name for the host.
- Region: Choose a region for the Bastion host. The region should be the same as the region of the virtual network where you want to deploy the host.
- Tier: Basic or Standard. We will go with Basic. At the time of writing this book, Standard is in preview. You can see the comparison between the SKUs here:
https://docs.microsoft.com/en-us/azure/bastion/configuration-settings#skus
- Instance count: You can specify the number of instances. The value can be from 2 to 50. Here we will go with the default value of 2.
- Virtual Network: Select the virtual network to which you have deployed the VM. Once you select the virtual network, you might see an error message stating that Azure is not able to find any subnet with the name AzureBastionSubnet. As mentioned earlier, you require a dedicated subnet to host Bastion. You can ignore this warning, and you will configure the subnet as the next option.
- Subnet: As of now, there are no subnets with the name AzureBastionSubnet. You can click Manage Subnet Configuration, which will redirect you to the Subnet blade of the virtual network. You can add a new subnet with the name AzureBastionSubnet and a subnet prefix of /27. Once you are done, click Create A Bastion, which will take you back to the Bastion creation wizard. Alternatively, you could create the subnet beforehand to avoid the hassle of going back and forth. The creation wizard will automatically pick up the subnet you created, and you will no longer see the warning.
- Public IP address: Create a new public IP address or associate an existing one. Since you don’t have any free public IPs, you can create a new one. If you have an existing public IP address, you can check this option and select the public IP address.
- Public IP address name: This is shown only if you are creating a new public IP. Give a name for the public IP address.
- Click Review + Create to start the validation. Once the validation is done, click Create to create the Bastion host. The creation may take longer, and you can resume once the host is created.
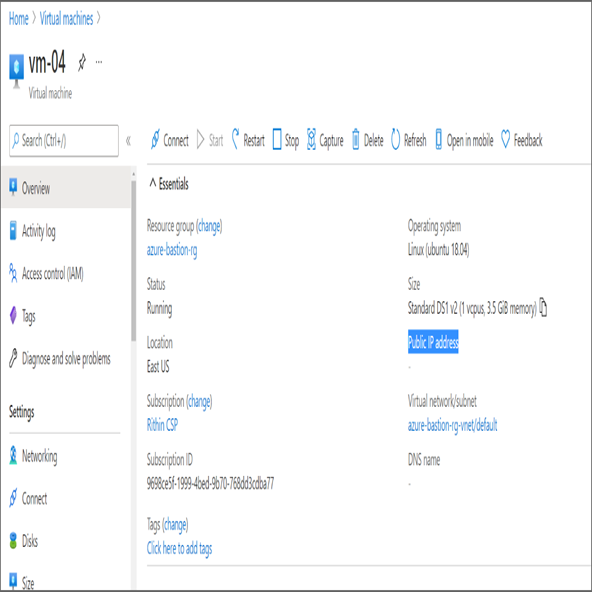
- After deploying the Bastion host, navigate to the Virtual Machines blade and click the virtual machine you created in steps 1 and 2. You clearly don’t have a public IP address for this VM.
8. Click Connect at the top and select Bastion.
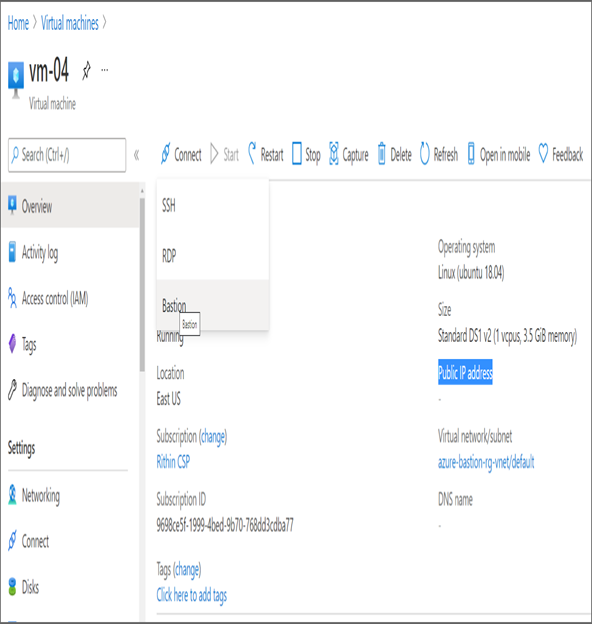
- Selecting Bastion will take you to the Bastion tab under the Connect blade. Click Use Bastion to use the Bastion service.
- In the new window, you will be asked to enter the username and choose the authentication type. Since you used password authentication, select Password (default option). Input your password, and you are good to connect to the VM using Bastion. You can check the Open In New Window to open the session in a new browser tab. If you are checking this option, you need to ensure that the browser is not blocking the pop-up.
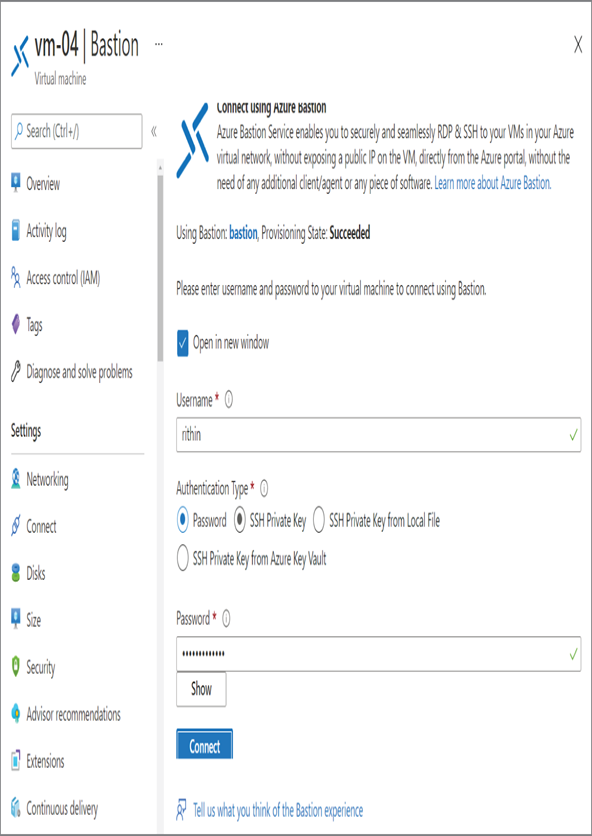
11. Click Connect, and you will be connected to the VM.
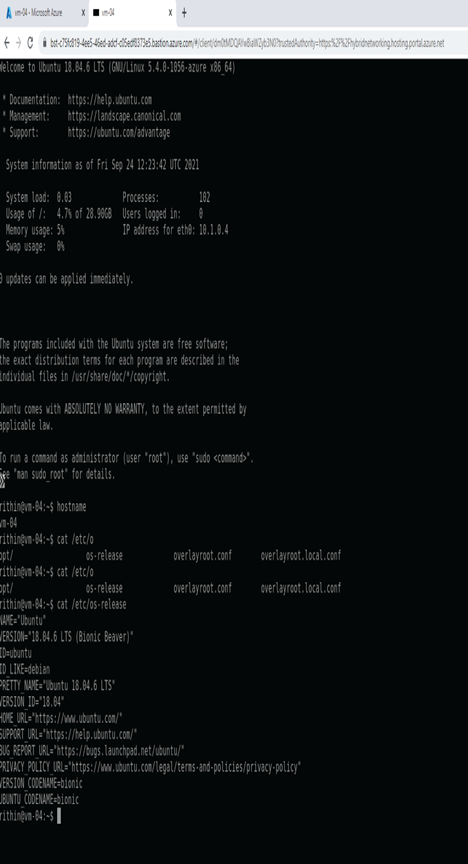
By using Bastion, you eliminated the need for public IP, and you connected to the VM over a secure channel. Using Bastion eliminates brute-force attacks and zero-day exploits against your critical VM workloads.